SUMMARY: This tutorial will help you in changing text font size in Windows 10 and making the text bigger on screen without changing DPI scaling.
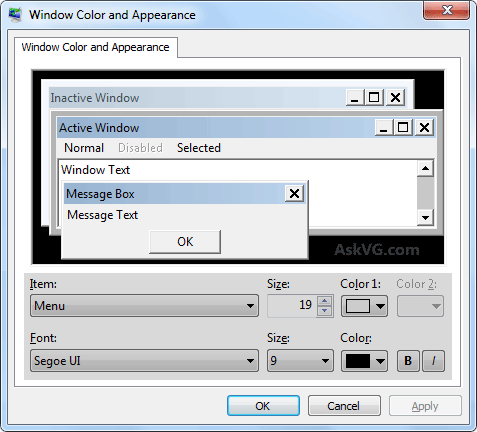
In older Windows versions such as Windows XP, Vista and Windows 7, users were able to change text and font size using Advanced appearance settings window which was available through Desktop Personalization or Desktop Properties. Older Windows versions allowed users to customize text color, font size, font type as well as style (bold, italic) using advanced appearance settings.
Following screenshot shows the classic advanced appearance settings window which was available in good ol' Windows versions:

When Microsoft released Windows 8, they removed advanced appearance settings feature from the OS. They only allowed users to change text font size using display settings.
We posted a tutorial to describe how to change text size, color, etc in Windows 8 and later Windows versions at following link:
But Microsoft also removed that working option from Windows 10 operating system. Windows 10 users were unable to change text size. The only possible way to increase text size and make everything bigger was changing DPI Scaling. But many times users don't want to change overall scaling. They just want to increase text size in Start Menu, File Explorer, software programs, etc without changing the scaling of their system.
Finally Microsoft listed to users complaints and requests and they added the feature to change text size only back to Windows 10 operating system.
Now the newer Windows 10 versions allow users to change and customize text font size. You can increase the text size according to your requirements.
If you are using a large display, the small text and font on screen may annoy you and you may face difficulties in reading the text correctly. Now you can make the text bigger and readable in Windows 10.
Following steps will help you in changing text font size and make the text bigger in Windows 10:
1. Open Settings app from Start Menu or by pressing WIN+I keys together.
2. Now go to "Ease of Access -> Display" section.
PS: Alternatively, You can directly launch this page using "ms-settings:easeofaccess-display" command in RUN dialog box as mentioned here.
3. Now in right-side pane, look for "Make text bigger" option.
To change text size and make it bigger, move the given slider to adjust the text font size. Windows 10 will show live preview of the new text size in form of sample text so that you can set the desired text size.

Once you are satisfied with the new text size, click on "Apply" button.
That's it. It'll immediately change the text size and you'll get bigger text and font everywhere across the system including traditional Win32 desktop apps as well as UWP apps.
Following screenshot shows bigger text only in Windows 10:

You can see in above screenshot, only the text size has increased. The scaling is unchanged.
BONUS TIP:
If you want to make everything bigger in Windows 10 such as text, window titlebars, toolbars, buttons, menus, dialog box, etc, you can use the "Make everything bigger" option given below the "Make text bigger" option.

Click on the drop-down box and select desired scaling such as 125%, 150%, 175% and Windows 10 will immediately change overall size and you'll get everything bigger on screen.
Following screenshot shows everything bigger in Windows 10:

PS: You can access the same "Make everything bigger" option from "Settings -> System -> Display" page. It's mentioned as "Scale and layout". You can also set any custom scaling by clicking on "Advanced scaling settings" option. You can enter any value between 100 - 500 in the given text box. Click on Apply button to make changes.


